
Step 1 (open screen)
From the Flightplan (FPL) menu, select the Create new Flightplan screen.
New FPL form - Flightplan
Step 2 (define flightplan information)
This screen provides you all of the necessary functions to create a new FPL, including functions for saving, loading, validating and filing of the FPL. Fields are included to give users the possibility to enter relevant flightplan information such as:
(7)
Aircraft ID:
Here you can enter the aircraft ID.
Flight
Rules:
Here you can choose the flight rules to be used.
Type
of Flight:
Here you can choose the type of flight.
Number:
Here you can enter the number of aircraft.
Type
of Aircraft:
Here you can enter the type of aircraft to be used. If no such designator
has been assigned, or in case of formation flights comprising more
than one type, ZZZZ has to be used. Click  if
you want to search for available aircraft.
if
you want to search for available aircraft.
Wake
Turbulence Cat.:
Here you can choose the appropriate wake turbulence category for the
aircraft.
Equipment:
Part 1: Here you can enter the Radio Communication, Navigation and
Approach Aid Equipment of the aircraft.
Part 2: Here you can enter the Surveillance Equipment of the aircraft
(not exceeding 2 characters).
(13)
Departure:
Here you can enter the aerodrome of departure. Click if you want to search
for available aerodromes.
Here you can select between four pre-defined aerodromes for departure
by using the drop down box.
EOBT:
Here you can enter the estimated off block time.
(15)
Cruising Speed:
Here you can enter the cruising speed:
K - Kilometres per hour followed by 4 digits (e.g., K0650)
N - Knots followed by 4 digits (e.g., N0485)
M - True Mach number followed by 3 digits (e.g., M082).
Level:
Here you can enter the cruising level:
F - Flight level followed by 3 digits (e.g., F330)
S - Standard metric level in tens of meters followed by 4 digits (e.g.,
S1110)
A - Altitude in hundreds of feet followed by 3 digits (e.g., A050)
M - Altitude in tens of meters followed by 4 digits (e.g., M0400)
VFR - for VFR flights without any digits.
Route:
Here you can enter the route to be used between aerodrome of departure
(ADEP) and aerodrome of destination (ADES).
(16)
Destination:
Here you can enter the aerodrome of destination. Click if you want to search
for available aerodromes.
Total
EET:
Here you can enter the total estimated elapsed time.
Alternate:
Here you can enter the first alternate aerodrome. Click if you want to search
for available aerodromes.
2nd
Alternate:
Here you can enter the second alternate aerodrome. Click if you want to search
for available aerodromes.
(18)
Other Information:
Here you can enter other information.
This option opens a tab to send a supplementary message for the selected flightplan. The following dialog is displayed.
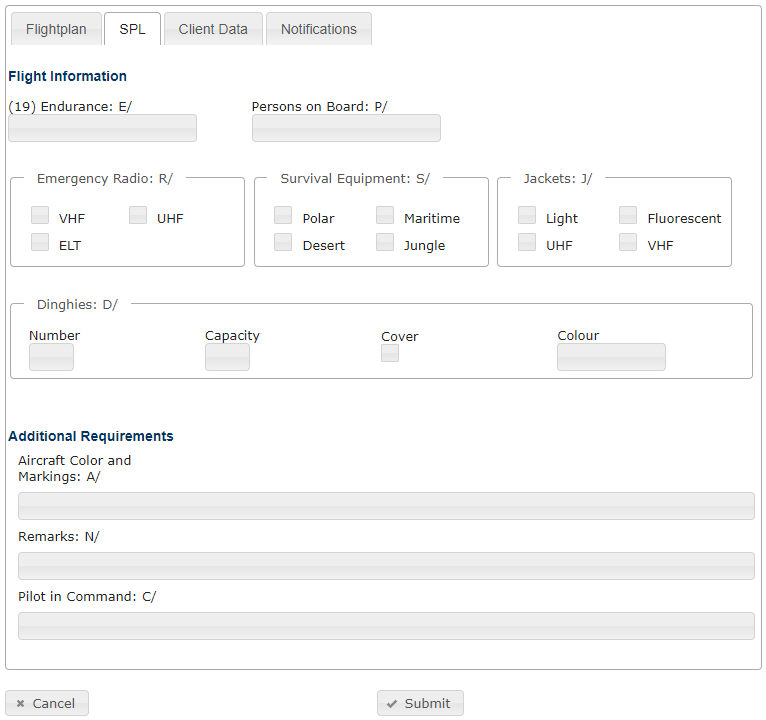
New FPL Form - SPL
(19) Endurance E/
Here you can enter information about endurance of the aircraft.
Persons on board P/
Here you can specify how many people are on board, or "TBN"
if this information is not available.
Emergency Radio R/
Here you can specify which type of emergency radio the aircraft
is equipped with.
Survival Equipment S/
Here you can specify which type of survival equipment is available.
Jackets J/
Here you can specify which type of Jackets are available.
Dinghies D/
Here you can specify which dinghies are available.
o Number
Here you can enter the number of dinghies on board.
o Cover
Here you can specify if dinghies are covered.
o Capacity
Here you can specify the capacity of one dinghy.
o Color
Here you can specify the color of the cover.
Aircraft Color and Markings A/
Here you can specify the color and markings of the aircraft.
Remarks N/
Here you can specify additional remarks.
Pilot in Command C/
Here you can enter the name of the pilot in command.
ARCID
Here you can enter the aircraft ID of the client.
Name
Here you can enter the
client's name.
Postal
Address
Here you can enter the postal address of the client.
AFTN
Address
Here you can enter the AFTN address of the client.
SITA
Address
Here you can enter the SITA address of the client.
Mobile
Phone Number
Here you can enter the mobile phone number of the client.
Contact
Phone Number
Here you can enter the contact
phone number of the client.
Fax
number
Here you can enter the fax number of the client.
E-Mail
Address
Here you can enter the e-mail address of the client.
Here you can specify the notification setting for the client.
Step 3 (send the flightplan proposal)
To save the flightplan, click the Submit button (Note: certain fields are required to be filled out before a flightplan can be saved). When Submit is clicked the flightplan is only transferred to the Flightplan - Overview screen without distribution or validating at IFPUV system.
![]() The finder
functionality for aerodrome of departure and aerodrome of destination
allows searching for non-ICAO aerodromes (up to six characters identifier).
If the user selects such an aerodrome, ZZZZ is added automatically to
the appropriate field. Additionally (according to ICAO Doc 4444) the name
of the aerodrome is added automatically to field 18 (Other Information)
with the appropriate prefix DEP/, DEST/and/or ALTN/.
The finder
functionality for aerodrome of departure and aerodrome of destination
allows searching for non-ICAO aerodromes (up to six characters identifier).
If the user selects such an aerodrome, ZZZZ is added automatically to
the appropriate field. Additionally (according to ICAO Doc 4444) the name
of the aerodrome is added automatically to field 18 (Other Information)
with the appropriate prefix DEP/, DEST/and/or ALTN/.